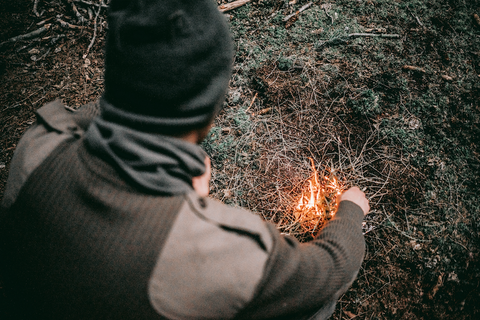
[VIDEO] Survival Minutes | The Multi-Use Military Poncho 🇺🇸
Join former Navy SEAL Cade Courtly in this edition of ‘Survival Minutes’ as he delves into the unmatched versatility of the military-issue poncho. Discover its history, life-saving capabilities, and how even a standard trash bag can serve as a makeshift survival tool. Equip yourself with knowledge and be a survivor, not a statistic!
Drop a comment below with your own survival hacks.
The Inside Scoop 🎬:
– Former Navy SEAL Cade Courtly demonstrates how a poncho can be utilized as a multi-tool.
– The military-issue poncho has been a reliable tool since the Vietnam era due to its versatility and life-saving capabilities.
– Key features: keeps you warm and dry, has a hood to prevent heat loss from the head, and is perfect for constructing an impromptu shelter with its corner pilot attachments.
– If you lack a military-issue poncho, a standard 50-gallon trash bag can serve similar purposes: collecting water, building shelter, or wearing it as a makeshift rain jacket.
Transcript 🎞️:
“Hey folks, this is former Navy SEAL Cade Courtley with your 4Patriots Survival Minute. I want to introduce you to the military issued poncho. You know why this thing is amazing? You know why they keep issuing this out since Vietnam? Because it can do so much and it can save your life. I never went anywhere without one of these.
Aside from the obvious of keeping you warm and dry. It’s got a hood on it. Most of the heat escapes from your head.
It’s also ideal for making a hasty shelter. You know what? Because it’s got eyelets on every corner, bungee cord, rope, stakes, you name it, perfect for a shelter.
If you want to, you can literally tie a knot in the hood, and use it to collect water.
If you do not have a military issue poncho, you probably have your standard 50 gallon trash bag. You can do all the same stuff. Collect water, make a shelter, you can cut a hole in the top and sides, and you can wear it like a rain jacket.
That’s it. I’m Cade Courtley with your 4Patriots Survival Minute. Be a survivor, not a statistic.”
Your How-to Guide for Handling a Power Outage
Do you have a plan for the next time a blackout happens? Are your three main bases covered – power, food, and water?
Because Hurricane Hilary flooded Southern California, damaging roadways and forcing residents to stay locked inside their homes…
Not to mention the historic rainfall in the Northeast that brought floods to New York, Vermont, Massachusetts, and Connecticut.
And heat waves in the South increased stress on vulnerable power grids. Meanwhile, Texas officials urged thousands of residents to “reduce their energy consumption” and endure the brutal heat.
So if you don’t have supplies and a plan… You might be in a whole lot of trouble in the near future…
Know what to do
As with just about everything else in life, the better prepared you are to deal with an outage, the better off you and your family will be.
Today you’ll get a refresher course on things to do before your power goes out. And while it’s out. As well as what to do once power is restored.
You might want to print this out so you can be ready to deal with the next blackout without even thinking about it.
Knowing exactly what to do when the next inevitable power outage occurs will come in handy. And it will certainly speed up your efforts to handle the situation.
Your 3 main bases
Below are some before, during, and after tips for how to handle a power outage. But before I get to them, let’s look at those three bases again.
Power – You need back-up power. A portable, solar-powered generator will help you keep lights on and power most appliances. If you only have a gas-powered generator, do NOT run it indoors or even close to your residence. Power banks are perfect for smaller electronic devices. Tactical flashlights kept in various places in your home will also be a big help.
Food – You need non-perishable food with a long shelf life. Make sure your survival food provides plenty of nutrition. Variety in your stockpile is also essential, especially in a longer blackout. And make sure the foods you store are ones your family will eat.
Water – You need at least 1½ gallons of water per person per day. One gallon is for drinking and the half-gallon is for cleaning, washing, etc. You should also have a water purification system for your home and smaller water filters for outdoor use.
Before a blackout
The better prepared you are for a blackout, the greater the chance you’ll be able to handle it successfully. Here’s what to do prior to a blackout:
- Put together a supply of emergency food and water for your family. Start with 72 hours’ worth, then build it up.
- Build an emergency kit or bug-out bag. Store your kit in an easily accessible place and let everyone in the house know where it is and what it contains. Consider having an additional emergency kit at your place of business in case a blackout occurs while you’re at work.
- Make a family communications plan and discuss all aspects of it with family members. Do a dry run every few months to make sure everyone is ready to carry out the plan if necessary.
- Follow energy conservation measures to keep the use of electricity as low as possible, which can help power companies avoid imposing rolling blackouts.
- Fill plastic containers with water and place them in the refrigerator and freezer if there’s room. Leave about an inch of space inside each one, because water expands as it freezes. This chilled or frozen water will help keep food cold during a temporary power outage.
- Be aware that most medication that requires refrigeration can be kept in a closed refrigerator for several hours without a problem. If unsure, check with your physician or pharmacist.
- Keep your car tank as full as possible because gas stations rely on electricity to power their pumps. In addition to being your emergency transportation, your car could also be your charging system for your cell phone, and possibly the only heating or air conditioning you’ll have for a while.
- Know where the manual release lever of your electric garage door opener is located and how to operate it. Garage doors can be heavy, so remember you may need help to lift it.
- Keep a key to your house with you if you regularly use the garage as the primary means of entering your home. Just in case the garage door will not open.
- Get a good supply of cash. Some stores may not be able to process credit card and debit card purchases, and cash machines may not be working.
During a blackout
You’ve already prepared for a blackout, so now you’re ready to deal with it. Here are some recommendations:
- Use only flashlights for emergency lighting. Never use candles during a blackout or power outage due to the risk of fire.
- If you’re using a generator to power any lights, be careful how long you keep them on. If your home is the only one lit up at night, you could become a target.
- Keep refrigerator and freezer doors closed to make sure your food stays as cold and fresh as possible. Check food carefully for spoilage.
- Turn off or disconnect appliances, equipment, and electronics that were in use when the power went out. They could be damaged if power returns with a momentary surge or spike.
- Leave one electrical item on – such as a light – so that you’ll know when your power returns.
- Don’t call 9-1-1 to gain information about the power situation. Use it only to report life-threatening emergencies.
- If it’s hot outside when the power goes off, go to the lowest level of your home. Wear lightweight, light-colored clothing and drink plenty of water even if you’re not thirsty. Keep window blinds and curtains closed to keep the heat out.
- Make sure your pets have plenty of fresh, cool water, and anything else they need for their survival and comfort.
- If it’s cold outside when the power goes out, wear layers of clothing. Don’t use your oven as a source of heat. Open window blinds and curtains during the day to let sunshine in.
- Fill the bathtub with water, as your faucet water flow may decrease or stop entirely over time. Duct tape the drain so that water does not leak out. Fill other containers with water as well, such as buckets.
After a blackout
Once power is restored, here are some tips:
- Throw out any food that has been exposed to temperatures of 40 degrees Fahrenheit for two or more hours. Same thing for any food that has an unusual odor, color, or texture. When in doubt, toss it out.
- Don’t use taste – or even odor or appearance – to determine if your food is still good or not. Food can look and smell OK, but may contain bacteria that causes food-borne illnesses.
- Don’t turn all your appliances back on at once. If everyone does that, it could overtax the grid and result in another regional blackout. Get your air conditioning or heat back on first, then wait 10 or 15 minutes before starting up other items or appliances you may need.
- If the water from your faucet has not been running, but now it’s working again, don’t drink from it right away. Let it run for a while and listen to local broadcasts or contact your local health department to find out if a nearby water source has been compromised during the blackout. Water purification systems usually rely on electricity, so they might not be working properly during a blackout.
Being prepared = self-reliance
People who have not prepared for an emergency will struggle with a temporary blackout and fall apart in a medium-length blackout.
But if you have fully prepared, a temporary blackout will be nothing more than a minor inconvenience. And a medium-length blackout will be one you can handle with some determination.
A long-term blackout will be a huge challenge for everyone. But you’ll be a leg up on everyone else if you are fully prepared with your power, food, and water needs.
Here’s How You Can Save Money While Stockpiling
“I wish I could prepare for an emergency. Unfortunately, I can’t afford it. I live paycheck to paycheck.”
While discussing preparedness with people, I’ve heard plenty of folks say that. And it’s true. Most of us have to put together our emergency food stash on a limited budget. We’ve got a lot of bills to pay.
But I’ve done the math and determined that proper budgeting would enable most of us to have at least a small amount of income available each month to prepare for an uncertain future.
And it’s not like it all has to be done at once. It’s an ongoing process. Slow but steady progress will get the job done.
Long shelf lives are key
Today I want to talk about the importance of stockpiling healthy, nutritious food for an emergency. It doesn’t cost an arm and a leg to do this. There are some simple and inexpensive things we can do to get ready for a crisis.
Following an emergency, it’s likely the electric grid will not be functioning properly. If at all. So you want to make sure a vast majority of your food items are non-perishable.
In addition, we don’t know how long an emergency will last. So it’s best to have as much food stockpiled as possible. And make sure most of it has a long shelf life. For items that don’t, rotate them out periodically so they don’t go bad.
If you’re not already in budget mode, try to get there. That means always thinking about how you can spend less and save more. Here’s some things you can work on to budget better:
- Never pay full price for anything. Always look for bargains. You’re better off spending time than money.
- Buy items in bulk at places such as Sam’s Club or Costco. Or when they’re on sale in regular stores.
- Cut and use coupons.
- Find and use in-store-only offers.
- Grow your own food and preserve it. There are tremendous savings in growing fruits and vegetables. And storing some of them for the colder months of the year.
- Watch for the best deals on websites such as Amazon. They could have exactly what you’re looking for, at a price much less than what you’d spend at a local store.
Tips and tricks
One of the first places you want to look at to save money is your weekly grocery bill. If you’re not paying attention, it can really add up. The average couple spends over $500 a month on groceries. Let’s look at a few simple ways to save.
Make a list. Grocers know how to position products so shoppers will purchase them. If you have a list, you know just what you need (and what you don’t). And of course, if you avoid shopping when you’re hungry, it’s that much easier to resist tempting displays.
Also, choose foods that your family will eat. Variety is important, both physically and psychologically. But you could buy some of the healthiest food in the store, and if your family won’t eat it, you’ve thrown your money away.
Buy store brands. Buying store brands alone can take a huge chunk out of your grocery costs. Sometimes there will be a brand name item or two that you can’t do without. But more often than not you won’t notice the difference. Except when it’s time to check out.
Use digital coupons. Many stores offer digital coupons not available in the weekly newspaper. To acquire these savings, you’ll likely need to set up an account and check off the coupons you wish to use each time you shop.
Doing this ahead of time as you scan the weekly circular can help you compile your shopping list around items with the biggest savings.
Stick to the store perimeter. Center aisles have many expensive, processed foods full of salt, sugar, and other additives. The outside ring of the store is where you’ll find more foods such as produce, meat, and dairy.
You’ll still need to visit the center aisles for a few things. But focusing on the perimeter will give you more bang for your buck. Try leaving your cart at the end of the aisle, and just dash in for the item you need.
Freeze meals. If you’re buying in bulk, you’ll want to make sure things don’t go to waste. You can freeze many items including bread, milk, and chopped vegetables, as well as whole meals. Just remember your power could go out in a crisis.
Use fewer ingredients. Sometimes the simplest food tastes best. But you wouldn’t always know it looking at some of the complicated recipes out there.
Sites such as Allrecipes (AllRecipes.com) are great for finding different options for your favorite recipes. And usually the top reviews will include tips on how to make them even easier.
Buy in bulk. I saved one of the best ones for last. We’re not talking here about warehouse stores, which have membership fees. And usually a minimum price tag of $10 per item. Even in a regular grocery store, you don’t want to buy large amounts of just anything on sale.
It’s about buying more of things you already use often when there’s a significant sale. If it means you shop less often, this can add up to even more savings.
Another item to purchase in bulk is produce. Onions, potatoes, apples, and lemons are almost always cheaper when you buy the bag. Just make sure you actually use them so they don’t go to waste.
Buying beans and grains in bulk can also stretch your dollars while providing hearty, healthy meals.
A challenge for you
I’m going to finish this communication with a challenge. I hope you’ll chime in with your remarks in the comments section below.
You have exactly $50 in your wallet and one empty food storage tote. What would you purchase to put in it?
Now, that exercise was just for fun. But if you recall, I recently told you about the grain deal that expired between Russia and Ukraine. Meaning the entire world – including America – could see food shortages and rising food prices very soon.
So, the time to stock up for real is now – before inflation hits our grocery stores again.
A Checklist to Help You Enjoy a “Cooler” Camping Trip
There’s just something about packing for a camping trip. Stopping by the grocery store to buy roadtrip snacks and food to cook over the fire. Packing up utensils and the cast iron skillet. Deciding which blankets would be best for a cozy night in the tent.
There’s a lot that goes into packing up for an outdoor getaway. And there’s nothing worse than realizing you forgot something.
So if you’re going camping over the next few weeks, you’ll need a well thought out packing list.
Fortunately for you, I’ve got just what you need. And to make it super convenient, you can print it out as a PDF and use it to prepare for your next camping trip.
When you’ve checked off everything you’ve packed, toss your printout in a bag. It’ll come in handy when you re-pack to head home.
How to chill in the heat
Now, you may be thinking, “Frank, I’d love to go camping, but it’s still pretty hot out there.” Well, I’m here to tell you there are ways to stay cool in the heat that you might not have considered. Including having backup power for fans and other items.
First, select a campsite that has some shade. Your tents should have mesh that allows airflow. A silk sleeping bag liner will keep you cooler than the typical sleeping bag. And use a battery-operated fan inside your tent.
Take a cool shower once a day. Wear light-colored, loose-fitting clothing. Keep the sun off your head with a brim hat. Carry white washcloths in your backpack. While hiking, periodically soak one with cool water and wrap it around your neck.
Take advantage of opportunities to wade in a cool body of water. As you walk, eat juicy fruits that will taste refreshing and keep you hydrated. And drink zero-sugar sports beverages for the electrolytes.
Don’t over (or under) pack
You probably won’t need everything on the list below. Just pick what works for you and your family or companions.
To me, camping is about getting away from the rat race. I want a different kind of routine when I’m away from home. It’s a nice change of pace to see, use, wear, and eat different things than normally.
You can make do with less on a camping trip by reducing the clutter. At the same time, you can still take all the essentials.
So, here’s the promised list of camping items. Which ones you choose could depend on whether you’re roughing it or heading to a campground where some amenities are provided. It might also depend on how long you’ll be gone.
General items
- Tent, with footprints, stakes and mallet/hammer
- Ground cloth/tarp
- Sleeping bags
- Sleeping pads
- Backpack
- Blankets and pillows
- Headlamps, flashlights and extra batteries
- Camp table and chairs (if the site doesn’t have them)
- Mini-grill or camping stove
- Lantern
- Clothesline with clips
- Toiletries
- First-aid kit
- Prescription meds
- Sunscreen and protective hats
- Insect repellant
- Lip balm
- Rain gear
- Extra clothing, including several pairs of socks and underwear
- Hiking boots
- Bandanas
- Survival knife
- Multi-tool
- Duct tape
- Paracord or rope
- Saw or ax for cutting firewood (if needed)
- Compass
- Binoculars
- Field guides for flowers and insects
- Whistle
- Walkie-talkies
- NOAA emergency radio
- Disinfectant wipes
- Documents including vehicle registration, insurance, reservations, etc.
Food/food-related items
- Perishable food packed in a cooler or ice chest
- Non-perishable food for snacking and meals
- Plenty of bottled water and other beverages
- Personal water purifier
- Fire starters
- Cooking, serving, and eating utensils
- Cooking pots, pans, plates, and cups
- Tongs and skewers
- Oven mitts
- Cutting board
- Tablecloth with clips or tape
- Canteen/thermos
- Coffee pot
- Can opener
- Heavy-duty aluminum foil
- Dishwashing liquid and sponges
- Paper towels and napkins
- Tupperware
- Zip-top bags
- Trash and recycle bags
RV Essentials
Recreational vehicles are a great way to travel and camp. But it’s best to know what to take with you in order to handle potential problems with a new-to-you vehicle. Here are plenty of items to consider:
- Your RV manual
- Drinking water hose
- Sewer kit including hose
- Surge protector
- Generator
- Electrical adapters
- Water pressure regulator
- Tire pressure gauge
- Emergency road kit
- Extra motor oil and fluids (washer, transmission, brake)
- Fire extinguisher
- Wheel chocks
- Rubber gloves
- Emergency brake cable
- Tire iron
- Tire patch
- Jack
- Leveling blocks
- Emergency warning light
- Fuses
- Well-stocked tool box
- Jumper cables
Stay powered up
As mentioned earlier, backup power is important on a camping trip. There are plenty of reasons for needing backup power. They include charging up your…
- Cellphones
- Emergency radio
- Mini-fridge
- Electric blanket
- Blender
- Hotplate
- Lights inside a tent
- Outdoor security lights
- Laptop or tablet
- Coffee maker
- Toaster oven
- CPAP machine and other medical devices
- Handheld electronic games
- Boombox
- Electric razor
- Mini-TV
- Blow-up mattress pump
- GPS unit
- Portable fans
Now you have a powerful list
Without backup power, any of the items listed above could prove useless on a camping trip. Yes, you could get by without some of them, but what if you had to make an emergency phone call?
Or what if an unexpected storm was headed your way and you needed information quickly? What if your perishable food started to go bad? Worst of all, what if you needed to power up crucial medical equipment?
Camping trips are a lot of fun and a great way to unwind with family or friends. They’re good for your body, mind, and soul. Just make sure you don’t forget to pack any of the essentials before you leave home.
What to Take on Your Next Outdoor Trip
We all have our pet peeves. One of mine is getting somewhere and realizing I forgot to bring something. Maybe that’s why I became a list maker.
Perhaps this is one of your pet peeves as well. If you’re headed to the outdoors soon – for camping, hiking, hunting, or whatever else – no worries. I’ve got you covered.
Today I’m going to provide you with a bunch of items to remember to pack BEFORE you leave home. These items that you can place in your vehicle or backpack are for both your convenience and for dealing with a possible emergency.
Not all of them will apply to your particular outdoor experience. But by running through the list, you can choose the ones that will be most helpful to you.
The absolute “musts”
A sturdy, waterproof camping tent with pegs and a hammer are musts if you’re planning to sleep outdoors. Of course, you’ll also want to include a sleeping bag and pillows, a blow-up mattress or sleeping pad, and extra clothes including socks and a poncho.
If you’re headed to a campground, find out if they supply wood for your fire or allow you to gather it in their surroundings. If not, take wood with you, assuming it’s permissible. Some places don’t allow that, due to the possibility of introducing new species of bugs to the area.
Among the tools you’ll want to pack are flashlights (and extra batteries), survival knife, compass, fire starters, extension cord, tarp, bungees, and duct tape.
You’ll need to eat, so don’t forget both non-perishable food and fresh foods in a cooler. As well as a compact cooking stove; disposable cups, plates, and utensils; and cleaning supplies like dish soap.
Toiletries go without saying. Including toilet paper, washcloths and towels, wet wipes, a fully-stocked first-aid kit, sunscreen, bug spray, and trash bags. And in addition to your cellphone, don’t forget power banks.
Hunting gear
If you’re going hunting, I’m sure you already have a comprehensive list of things you want to pack for the trip.
Among them will be maps of the area in which you’ll be hunting. You might want to look into gaining permission to hunt on private land, which will be less crowded.
Pack your flashlights, headlamps, two-way radios, etc., and make sure you have plenty of batteries for each. Also include your knives, game bags, nitrile gloves, multi-tool, and paracord.
In addition to your firearms and ammunition, pack your binoculars, game calls and orange flagging ribbon. Toss in a whistle and small mirror for signaling, plus an emergency blanket and an extra pair of boots.
Water for drinking, cleaning, and bathing is also a must. But it’s equally important to include ways to purify water from other sources. Such as lakes, rivers, streams, and creeks. Here’s a quick look at a few of those ways:
Boiling and disinfecting:
- Boiling water can get rid of potential bacteria, germs, viruses, parasites, and other pathogens. First filter the water through a paper towel or coffee filter. Then bring it to a rolling boil for at least 1 minute, or 3 minutes at an elevation of 6,500 feet or higher. Next, let that water cool and store it in a sanitized container with a tight cover.
- If you find it’s impossible to boil water, disinfect it with an unscented household chlorine bleach. First filter the water if it’s cloudy. If the bleach has a 5-9% concentration of sodium hypochlorite, add 2 to 4 drops of bleach into a quart container. Shake the container for 1 minute, then turn it upside down and loosen the cap slightly to allow the water flow to clean the bottle threads and cap. Let the bottle sit in a shaded area for a half-hour until the water looks clear.
Iodine & chemical tablets
- Iodine and tablets with iodine (also called tetraglycine hydroperiodide) can kill most germs and can be effective at making small amounts of water safe to drink. But it’s not recommended for pregnant women and those with thyroid issues or shellfish allergies. And it’s not recommended for anyone for more than a few weeks.
After you drop the iodine tablet in, shake your container for about a minute. Then hold the container upside down and unscrew the lid very slightly to allow the iodine to flow into the threads of the bottle cap. Iodine tablets usually require about 30 minutes to take effect
UV lighting and solar water disinfection
- UV light has also proven effective in ridding water of small organisms. Some UV light devices are battery-free and work with a hand crank.
- A simpler method is filling a plastic bottle with water and allowing it to sit out in the sun for a full day. The sun’s UV light will kill most biological hazards in the water.
This solar water disinfection method is easy but does not help with chemical contaminations. Note: They are not as reliable when the contaminants are large, floating particles. And pathogens can hide behind or inside those particles.
Solar cooker
- The solar cooker you use for food can also be employed to remove pathogens and other harmful microorganisms from water. The solar ultraviolet light rays are converted into infrared light rays inside the cooker to produce cleaner water.
Depending on weather conditions, water can be heated to 212 degrees Fahrenheit in about 45 minutes.
Safety tips for drinking from outdoor water sources
In closing, here are some outdoor water safety tips I want to share with you. When acquiring water from lakes, rivers, streams, creeks, etc….
- Avoid water with a strange hue or film on it, and avoid water that is not clear.
- Try to find moving water as opposed to still water.
- Avoid water where there is active growth in it, such as algae or scum.
- Avoid water near roadways or pavement, as it likely has oil and pollutants in it.
- Stay upstream of industrial facilities, mines, and construction.
- Avoid water from farmland, as it might have large amounts of fertilizer and pesticides in it.
It’s possible you’ll only need one way to clean your water while outdoors. But it’s better to become well versed in a variety of methods because you never know which supplies you’ll have with you during a crisis.
Knowing you’ve packed everything you need for your next outdoor trip will make it all the more enjoyable.
Benchmade 140 Nimravus: Unleashing Precision
Interested in the Benchmade 140 Nimravus Survival Knife? Want to know more about it before you buy? Check out our review below. Survival Knife Review: Benchmade 140 Nimravus Fixed Blade Knife In previous articles, we discussed choosing a fixed-blade survival knife. Check them out in the links below: Part 1 Part 2 Part 3 A […]
Unusual Ways to Start a Fire
There could come a time in your life when you need to make an outdoor fire. Perhaps for cooking or warmth. Maybe for light or purifying water. Possibly even for protection from animals or attracting the attention of rescuers.
Do you know how to do it? What if there were no dry wood available and you didn’t have a lighter in your backpack?
Knowing a variety of ways to start a fire could come in handy someday. It could even be a lifesaver. Better to have this knowledge and not need it than not have it and need it.
Today I want to discuss a variety of unusual ways to start a fire, including a few you may never have considered before.
Fire’s three friends
First though, let’s review a few things about fire. Just as we need fire to survive, fire needs things to thrive. They are fuel, oxygen, and ignition.
Fuel for a fire is pretty much anything that will burn. The slower it burns, the better. For cooking, items such as wood, various grasses, and dry manure work best.
Oxygen keeps a fire going. And the air surrounding fire is usually adequate for that. Except for some situations when the immediate area is too tightly confined.
Ignition methods are plentiful. But most of them are not easy to accomplish. The easiest ways to start a fire are by using a disposable cigarette lighter or a magnesium starter stick.
Tinder & kindling
As far as fire-starting materials are concerned, you want to make sure you have tinder and kindling. Long-term fuel can also be very useful, but you might not have that with you.
Dry paper is great for tinder. But if you need to depend on what you find in the wild, you’ll want to gather some or all of the following:
- Finely-shaved dry wood or bark
- Dry grass or leaves, shredded if possible
- Bundles of dried bird or rodent nests
- Dry tree moss (also known as “Old Man’s Beard”)
- Dry plant seed fluff, such as cattail heads
Kindling burns more slowly and can keep a fire going for a while. It includes sticks, twigs, bark, and dried grasses that have been bundled.
Your best long-term fuel is logs. They will burn better and longer if you split each one several times. Dead branches also work.
Choose the right matches
Returning to our ignition methods for a moment, here are two items you should have with you in the wild. Even if they’re not your primary fire starters:
- Waterproof matches. You can find these at sports outlet stores. They work very well, although they’re somewhat expensive and should be rotated out every few years.
- Stick matches. They’re better than paper book matches, but need to be rotated out every six months or so. You also need to keep them dry.
As mentioned, your two easiest fire starters are magnesium sticks and cigarette lighters. A mag stick can be used about 100 times. They’re perfect for outdoor usage because they’re waterproof. And they don’t age or freeze.
9 unusual fire-starting methods
Following are 9 of the more unusual ways to start a fire. You may want to choose one of these methods if you don’t have the materials previously discussed.
9V battery & steel wool. Keep a container of lint from your dryer in your backpack. Fluff up your steel wool to get some air in it. Then touch it all over with the positive and negative terminals of a 9-volt battery to spark a fire. Continue to touch it in multiple places, then add the lint as tinder and blow on it softly.
Aluminum can & chocolate bar. Rub a candy bar on the bottom of an aluminum can until the can bottom shines like a mirror. With direct sunlight on the can bottom, it will heat up to the point where it can ignite your kindling when held against it.
Sandwich bag & water. Crush a piece of dry tree bark into a powder. Place the powder onto a solid piece of bark. Pour water into a sandwich bag until it’s half-full. Tilt the sealed baggie to the side and then twist it at the top, making it into a liquid sphere. Use the baggie as a magnifying glass over the powder until the sun’s rays make it start smoldering. Then press the powder onto your kindling.
Vaseline & cotton ball. Pull a cotton ball apart – but not completely apart – and rub Vaseline or petroleum jelly all over it. Roll the cotton back into a ball. Use a magnifying glass or reading glasses and the sun’s rays to heat the cotton ball, which will hold a flame well once ignited.
Gum wrapper & battery. While you’re chewing a stick of gum, cut the foil it was wrapped in into a bowtie or hourglass shape. With two fingers of one hand, hold the two ends of the foil against the ends of a small battery. The foil will ignite and you can quickly light your tinder.
Dead lighter & paper. Maybe you were planning to use a lighter to start a fire, but it died on you. Not to worry. Remove the lighter’s safety lock and slowly roll the lighter over paper, back and forth. As the steel wheel grinds down on the flint rod, flint shavings will be created. Form those shavings into a small pile and then flick your dead lighter repeatedly over the pile until it ignites.
Water bottle or balloon. Lay a clear plastic bottle full of water on its side with the cap on. Then place dark-colored tinder in the beam of sunlight that passes through the bottle. Once the tinder begins to smolder, place it into your fibrous tinder and blow on it softly. You can do the same with a balloon filled with water.
Citrus fruit. Because citrus oils are flammable, you can set it on fire if you can generate some sparks. Take a citrus fruit such as an orange, carve out a hole on the top and clear out some of the flesh. Let the orange dry out. Now push a small rock into the hole and rapidly rub a tool such as a knife on it until it sparks.
Flashlight. After removing the top lens of a flashlight, pull out the reflective cone that the light bulb rests in. Put dried moss or grass into the spot where the bulb was and place the cone in direct sunlight. Eventually the sunlight’s reflection will heat the tinder enough to cause it to burn.
Just as fire can be your best friend, it can also be your worst enemy. Yes, it can protect you, but it can also kill you.
When contained, fire can be controlled and used however you want. But when it escapes containment, it can destroy thousands of acres of forest, land, and buildings.
Fire can save your life, but only if you learn how to create it and control it.
Build the Ultimate Bug Out Kit for Survival | Essential Gear Guide
As natural disasters, civil unrest, and other emergencies become more common, it’s important to be prepared for the worst. One of the best ways to ensure your safety and survival is to have a well-stocked bug out kit. A bug out kit, also known as a go bag or a survival kit, is a collection […]
Bug Out Cooking Kit: Essentials for Survival
In times of emergencies or disasters, having the right tools and equipment can make a significant difference in ensuring your survival. A bug out cooking kit is a crucial component of any emergency preparedness plan. This guaid covers bug out cooking kit their importance and their effective use in survival situation. Get prepared with knowledge. […]
Bug out Useful Items: Be Prepared for Anything
When disaster strikes and you need to evacuate quickly, having a well-prepared bug out bag can be a lifesaver. A bug out bag is a portable kit that contains essential items to sustain you during an emergency situation. Whether it’s a natural disaster, civil unrest, or any other unforeseen event, having the right bug out […]
